SkyHook has gone to the streets of the US with vehicles similar to Google street view cars and instead of capturing images, captured wireless network information and precise geographic information about those networks. To develop this database, Skyhook has deployed specialized vehicles to survey every single street, highway, and alley in 2500 US cities, scanning for Wi-Fi access points and plotting their precise geographic locations.
Now that Google Maps has made its way over to the iPod touch, the introduction a new feature called My Location has been introduced. Previously this feature was restricted to devices like the iPhone on a cellular network devices using cell antenna triangulation to determine location. With no cellular hardware in the iPod touch, how would My Location work? Enter SkyHook. Have you heard of SkyHook? SkyHook has gone to the streets of the US with vehicles similar to Google street view cars and instead of capturing images, captured wireless network information and precise geographic information about those networks.
To pinpoint location, WPS uses a massive reference network comprised of the known locations of over 23 million Wi-Fi access points. To develop this database, Skyhook has deployed specialized vehicles to survey every single street, highway, and alley in 2500 US cities, scanning for Wi-Fi access points and plotting their precise geographic locations. Source
SkyHook even has a Google Maps plug-in that will show you what areas have been scanned and are in the database. And yes, it works. Eerily well.
Follow these steps to use your iPod.Prerequisites: You must have an iPod with 8GB (that means 8GB iPod Nano, any HD based iPod, etc) Note: the iPod Touch + iPhone will not work for this.
So I had a lot of traffic and comments on my previous entry about how to install Leopard from an ISO without burning a DL-DVD. With that, the number one question everyone has been asking me is, “Can you an iPod to install Leopard?” and the answer is an astounding Yes! Follow these steps to use your iPod.Prerequisites:
You must have an iPod with 8GB (that means 8GB iPod Nano, any HD based iPod, etc)
Note: the iPod Touch + iPhone will not work for this. You need to have a click-wheel iPod that supports Disk Mode
A Leopard ISO
UPDATED: 11/18/2007Important Notes:
Intel based Macs can only boot from USB devices using the GUID partition scheme (this means 5G iPods, 2 & 3G iPod Nanos)
PowerPC (PPC) based Macs (ie G3, G4, G5 Processors) can only boot using Firewire devices using the Apple Partition Map scheme (all firewire iPods)
I have had a lot of people have random problems when restoring the disc image to the iPods. Please make sure you have an exact image of the Install DVD. If there are any inconsistencies, there will be problems restoring the image. Please check the checksum of the images.
Procedure:
Reset your iPod and force it into Disk Mode – Press and hold Menu + Center until you see the Apple logo. Then Press and Hold Center + Play/Pause. The screen should turn to gray-scale and show “OK to Disconnect” (circa old old ipods).
Connect the iPod to your computer (do not use a USB hub if possible).
iTunes will launch automatically and probably start syncing. Make sure “Enable Disk Use” is checked on the settings for iTunes and press Sync one more time.
Quit iTunes and launch the Activity Monitor and quit the iTunes Helper.
You should still see the iPod listed on your desktop as a mounted drive. If you don’t see the iPod mounted on the desktop, return to step 1.
Open Disk Utility
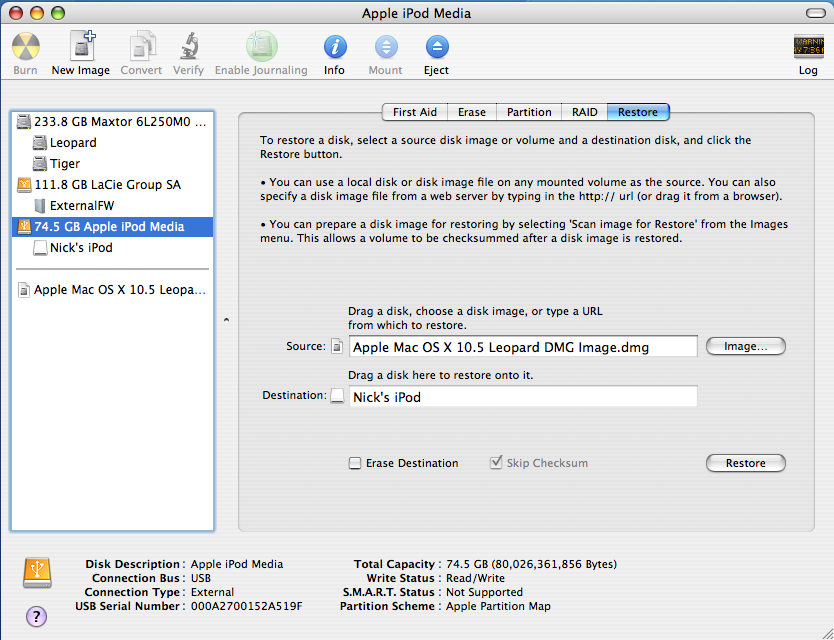
Select the iPod (the top one, mine is labeled 74.5 GB Apple iPod Media) then select the Partition tab.
Change the selection from “Current Partition Scheme” to “1 Partition”. Click on Options and select GUID Partition Table and press OK. (NOTE: If you are going to use a PowerPC based Mac, ie G4 or G5, you need to select Apple Partition Map here. GUID is for Intel Macs ONLY)
Give the Partition a name and select Partition. The system will ask you to authenticate.
Click on the Restore tab and drag the iPod partition to the Destination field
Drag the Leopard image file to the Source field and press Restore.
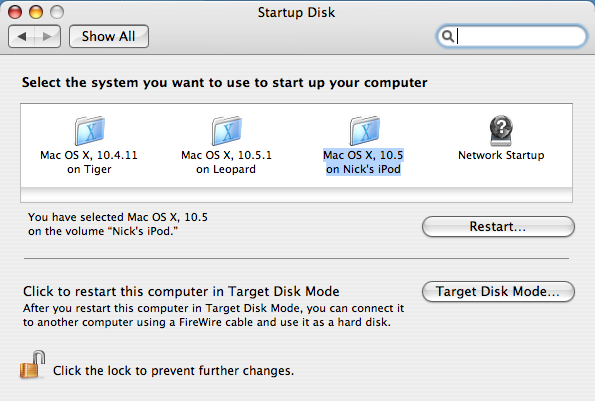
Once complete, open System Preferences and go to the Start up Disk option. Make sure you see the iPod listed there. Select the appropriate drive and click restart.
Install Leopard!
** If you are using a PowerPC Based Mac (G4, G5), you must use the Startup Disk utility in System Preferences to select the startup volume and reboot from this tool. Notes:
It’s really important the iPod stay in Forced Disk mode. If you try and boot up the Mac with the iPod connected but not in Disk Mode, it won’t do anything
Video Guide:
Full Resolution Quicktime MOVBecause of the amount of feedback I get on this article, I am disabling comments on this post and would like to invite readers to discuss on the newly created forum, http://nickganga.com/forum.
Hi everyone. Since there is so much feedback to this article, I’m going to have to close the comments. If you want to chat with me, use my GTalk Widget on the sidebar or send me a message on Twitter. Thanks.
Make sure that the drive is formatted using a GUID partition scheme (you may need to reformat your drive to get it in this form). The procedure is the same for an external hard drive, just substitute the iPod partition for the partition on your external hard drive.
So if you’re like me, you like to make legitimate backups of your software and original install discs. I always make an image of the disc using Disk Utility, included in OS X. Well, lets say you made a backup image of the new Mac OS X Leopard 10.5 disc and then accidentally destroy the disc, but you need to install the OS. Disk Utility to the rescue! As long as you have a spare external hard drive (I’m using a USB one in this case), you can extract the image to the HD and boot from it. Here’s how:
Start by creating the disc image of the installation media (this can be DMG, CDR, ISO or any of the disc image formats supported by Mac OS X).
Connect your external drive and launch Disk Utility.
Select the drive in Disk Utility and then select the Partition tab. Make sure that the drive is formatted using a GUID partition scheme (you may need to reformat your drive to get it in this form). (NOTE: If you are going to use a PowerPC based Mac, ie G4 or G5, you need to select Apple Partition Map here. GUID is for Intel Macs ONLY)
Once the drive is in the GUID partition scheme.
Select the Restore tab of Disc Utility and drag the Disk Image for the Installation Media onto the Source field.
Then drag the appropriate partition (in my case, the USB external drive) to the destination field.
Press restore.
Once the restore is complete, launch System Preferences and select Start up Disk. You should now see the external drive listed as a start up disk. Select it and press restart. You can now install as if you had inserted the DVD!
Additional notes:
Plug the HD directly into the computer, not into a Fire wire or USB hub. The installer had trouble finding the internal HD when connected through a USB hub.
This procedure should be the same for previous versions of OS X as well, except for PowerPC versions. PowerPC versions probably need to change the partition format of the drive to Apple Partition Map, but I’m not sure.
Video:Here is a demonstration of using an iPod as the external media. The procedure is the same for an external hard drive, just substitute the iPod partition for the partition on your external hard drive.
Hi everyone. Since there is so much feedback to this article, I’m going to have to close the comments. If you want to chat with me, use my GTalk Widget on the sidebar or send me a message on Twitter. Thanks.
I blogged two YouTube videos on May 11 and it appears the first one is no longer up. When you click on it, it shows up with a red warning “Content removed by user.” I wonder why it’s down…Oh well, I found the source video (MOV).
I blogged two YouTube videos on May 11 and it appears the first one is no longer up. When you click on it, it shows up with a red warning “Content removed by user.” I wonder why it’s down… Oh well, I found the source video (MOV).
To pinpoint location, WPS uses a massive reference network comprised of the known locations of over 23 million Wi-Fi access points. To develop this database, Skyhook has deployed specialized vehicles to survey every single street, highway, and alley in 2500 US cities, scanning for Wi-Fi access points and plotting their precise geographic locations. Source