OS X + Active Directory + Notebooks

Working with OS X, Windows, Active Directory and other network services as much as I do, I came across a great tip when adding a leopard based machine to a AD domain today. After you bind the machine to the domain, make sure to enable the option called “Create mobile account at login”, especially if the machine is a notebook. I’m not going to say I learned this from experience, but hey you get the drift.

Create mobile account at Login

After binding to your domain, select “Show Advanced Settings” and select the “Services” tab. Open the Active Directory settings and enable the Create Mobile Account at Login check box and confirmation box if necessary.

Last Minute WWDC Predictions

 New iPhone: 3G, GPS, Video Calling (iChat Mobile), Some New Apps (in addition to App Store) WiFi Enabled iTunes Sync using Bonjour .Mac Rebrand: Possibly to this Mobile Me thing everyone is talking about (OTA Sync) OS X 10.6 Timeline New iTunes New Mac Mini 

With the Apple WorldWide Developer’s Conference kicking off in about an hour, I figured I’d throw my $0.02 out there for what I think might be coming. Let’s see how correct I am in a few hours.


  •  New iPhone: 3G, GPS, Video Calling (iChat Mobile), Some New Apps (in addition to App Store)
  • WiFi Enabled iTunes Sync using Bonjour
  • .Mac Rebrand: Possibly to this Mobile Me thing everyone is talking about (OTA Sync)
  • OS X 10.6 Timeline
  • New iTunes
  • New Mac Mini 
  • New OS X Touch product


Mac Mini, Phase 1

Once the power has been separated from the optical block, I cut the power cords and attached quick connect adapters to the ends of the wires, for both the CD Changer and the Satellite radio connections.

Well, I am HAPPY to announce that Phase 1 of the MacMini in car server project has been completed. I have successfully installed the power supply and router for the MacMini in the BMW 325 Wagon Project. Sparing you the details of the project (those will come later), let’s go through the steps I went through today.

BMW Trunk
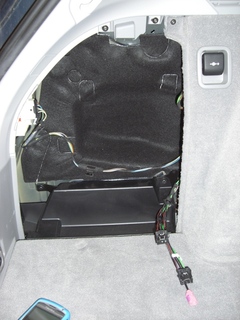
This project starts in the trunk of my wagon. Since the plan was to install the MacMini into the trunk of the vehicle, I started my expedition in the CD Changer/Satellite Radio compartment of the trunk. Since I do not have the CD changer or satellite radio, the trunk compartment has both connections waiting in the trunk. Each of the connections has two components: power and optical connection. For this project, I will not be using the optical connections but the power instead. 

BMW Accessory Connectors
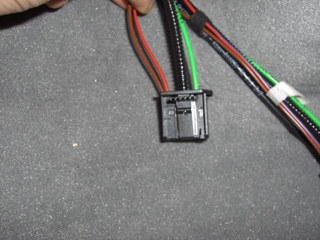
The power connectors (Brown & Orange+stripe) are connected to the plug as one, but can be separated from the kit. The first step is to separate the power from the optical block. Once the power has been separated from the optical block, I cut the power cords and attached quick connect adapters to the ends of the wires, for both the CD Changer and the Satellite radio connections. This provides me with power for both the Primary and Secondary power connections that come out of the Carnetix power inverter system. Once the power connector was separated, I cut the power cords and crimped on the quick connect ports. 

BMW Connector Separated
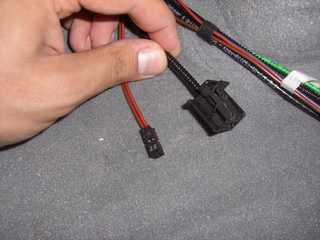
Now that the power has been separated, I went ahead and crimped on the corresponding quick connect clips to the wires on the cable supplied by Carnetix. 

BMW Quick Connects
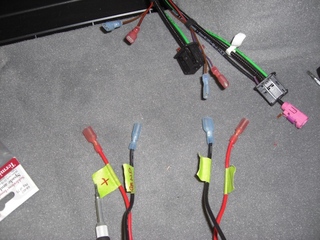
Notice that all the quick connects are crimped on and ready to go. ?The next step for the install involved finding  a 12V source that only came online when the car is in Ignition On mode. Luckily, there is a 12V power plug located in the trunk right next to the compartment for the CD Changer, et all. I connected the ignition indicator wire to the positive line from the 12V source.
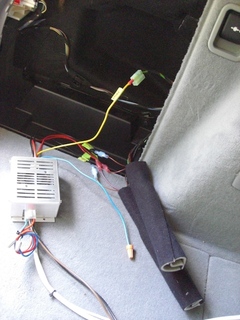
 BMW Final Power

This completes the power requirements for the MacMini + BMW system.
Now that the power has been configured, there are two more steps to completing the phase: the fon router & connecting to the aux audio input. Save that for Part 2. 🙂

Installing Leopard Without Burning a DL-DVD

Make sure that the drive is formatted using a GUID partition scheme (you may need to reformat your drive to get it in this form). The procedure is the same for an external hard drive, just substitute the iPod partition for the partition on your external hard drive.

So if you’re like me, you like to make legitimate backups of your software and original install discs. I always make an image of the disc using Disk Utility, included in OS X. Well, lets say you made a backup image of the new Mac OS X Leopard 10.5 disc and then accidentally destroy the disc, but you need to install the OS. Disk Utility to the rescue! As long as you have a spare external hard drive (I’m using a USB one in this case), you can extract the image to the HD and boot from it. Here’s how:

  1. Start by creating the disc image of the installation media (this can be DMG, CDR, ISO or any of the disc image formats supported by Mac OS X).
  2. Connect your external drive and launch Disk Utility.
  3. Select the drive in Disk Utility and then select the Partition tab. Make sure that the drive is formatted using a GUID partition scheme (you may need to reformat your drive to get it in this form).  (NOTE: If you are going to use a PowerPC based Mac, ie G4 or G5, you need to select Apple Partition Map here. GUID is for Intel Macs ONLY) 
  4. Once the drive is in the GUID partition scheme.
  5. Select the Restore tab of Disc Utility and drag the Disk Image for the Installation Media onto the Source field.
  6. Then drag the appropriate partition (in my case, the USB external drive) to the destination field.
  7. Press restore.
  8. Once the restore is complete, launch System Preferences and select Start up Disk. You should now see the external drive listed as a start up disk. Select it and press restart. You can now install as if you had inserted the DVD!

Additional notes:

  • Plug the HD directly into the computer, not into a Fire wire or USB hub. The installer had trouble finding the internal HD when connected through a USB hub.
  • This procedure should be the same for previous versions of OS X as well, except for PowerPC versions. PowerPC versions probably need to change the partition format of the drive to Apple Partition Map, but I’m not sure.

Video:Here is a demonstration of using an iPod as the external media. The procedure is the same for an external hard drive, just substitute the iPod partition for the partition on your external hard drive.  

Full Resolution Quicktime MOV Happy Installing Everyone! 

Hi everyone. Since there is so much feedback to this article, I’m going to have to close the comments. If you want to chat with me, use my GTalk Widget on the sidebar or send me a message on Twitter. Thanks.

Take Note!

I, of course, have been using my laptop coupled with my favorite note taking app for Windows to take notes (paper + pencil is so archaic, duh). On that note, I have to say I am so sick of seeing people use Microsoft Word (Mac + PC) to take notes for classes.

After enjoying a couple months off from school, I find myself back in class four days a week learning basic biology. I, of course, have been using my laptop coupled with my favorite note taking app for Windows to take notes (paper + pencil is so archaic, duh). But for the first time in my academic career (outside my computer science classes, I should say), at least 1/2 of the students in the class are also using notebook computers to take notes! This is great proof that my generation (± a few years) are becoming more comfortable using computers for more than just Internet, email and media.

On that note, I have to say I am so sick of seeing people use Microsoft Word (Mac + PC) to take  notes for classes. While most people immediately flock to the o-so-familiar Microsoft Word app to record text, there quite a few applications for both platforms that perform much better for the task at hand.

Starting with OS X (as I started my note taking career on a Powerbook), there are of course the usual suspects: TextEdit (included with OS X) and Microsoft Word for Mac ($149). These two apps will do the job, but not very well. TextEdit is limited in functionality and Microsoft Word is heavy and not Intel native. This is where The Omni Groupcomes in. When I purchased my first Mac (Titanium Powerbook) it came with a program called Omni Outliner from The Omni Group. After messing around with other the other applications, I found Omni Outliner to be the best at keeping notes, thoughts and attachments in one simple workspace. The application is light (especially compared to Microsoft Word), Intel native and follows Apple’s Inspector driven interface. But best of all, Omni Outliner comes standard on EVERY Mac that ships, and it’s a full licesnse.
Omni Outliner

Omni Outliner makes it easy to:

  • Use rich style sheets to define your document’s template
  • Add attachments directly to the file (not just references, be embedded files)
  • Easily create multiple bullet styles, including check marks for lists!
  • Easily create bookmarks throughout your document for quick reference
  • Export to multiple file formats, including PDF, XML, PlainText, RTF and more

For those of you who use Microsoft Windows as your operating system, fear not. At the launch of Office 2003, Microsoft added a new application to the suite called One Note. At it’s core, OneNote is a digital notebook (which I believe to be heavily inspired by the emergence of Tablet PCs) that can be used for note taking, project management, brainstorming and more. It features a familiar WYSIWYG interface with a few exceptions. First, there is no save button. OneNote is always saving, always tracking changes, and therefore requires no manual saving. In OneNote 2007, Microsoft released new features that allow users to make audio and video recordings of meetings or lectures, for example (hardware dependent of course) as well as share their notebooks with other users and collaborate simultaneously. As far as the Windows world goes, there isn’t any comparison. OneNote 2007 delivers the best note-taking product I have ever used and I highly recommend it to anyone using their Windows based PC to take notes. Download a free trial from Microsoft here, but students rejoice! There is an Academic edition of OneNote 2007 available also!
Microsoft One Note 2007Microsoft One Note 2007 Academic Edition – $44.95 from Academic Superstore

SlimServer

I just found a program for OS X that lets you stream all of your iTunes content, including purchased media, to any computer. Slim Devices server software SlimServer is the FREE solution. SlimServer

Wow. I just found a program for OS X that lets you stream all of your iTunes content, including purchased media, to any computer. It’s like having your iTunes everywhere! Slim Devices server software SlimServer is the FREE solution. Check it out!

SlimServer

Apple BootCamp

As a funny side note, the BootCamp site has a silly disclaimer on the side: Word to the WiseWindows running on a Mac is like Windows running on a PC.That means it’ll be subject to the same attacks that plague the Windows world.So be sure to keep it updated with the latest Microsoft Windows security fixes.

After the major announcement last year that Apple was going to switch to Intel processors and the surprise announcement of the Intel iMac and MacBook Pro in January (six months ahead of schedule), Apple has done it again. Shortly after a few programmers were able to get BIOS emulation to work on the Mac, Apple released a new product BootCamp.

More and more people are buying and loving Macs. To make this choice simply
irresistible, Apple will include technology in the next major release of Mac
OS X, Leopard, that lets you install and run the Windows XP operating system
on your Mac. Called Boot Camp (for now), you can download a public beta
today.

Obviously only compatible with the new Apple computers with Intel chips (MacBook Pro, iMac, MacMini), BootCamp not only allows users to setup and install Windows XP, it even burns a CD with the core drivers (Graphics, Networking, Audio, Airport Wireless, Bluetooth, The Eject Key, and Brightness Control) for Windows. This was the main problem with the hack-around method before as users were faced with unstable performance.

The real question now is, how well does it perform. Shortly after the announcement of BootCamp, I downloaded and installed Windows XP on my 20′ iMac with an Intel Core Duo processor running with 2 GB RAM. The install went very quickly and as I began to install applications (Microsoft Office, Adobe Creative Suite, Macromedia Studio 8) I noticed that they were installing faster than on my PCs. I launched Adobe Photoshop and began working with some RAW images. I applied some filters and effects and the results were astounding. The performance completely blew my current PC setup out of the water! Illustrator and Flash gave similar results. The verdict? Not only does the iMac perform amazingly with OS X, it simply fies with Microsoft Windows.

As a funny side note, the BootCamp site has a silly disclaimer on the side:

Word to the Wise
Windows running on a Mac is like Windows running on a PC.
That means it’ll be subject to the same attacks that plague the Windows world.
So be sure to keep it updated with the latest Microsoft Windows security fixes.

🙂 Apple, you never cease to amaze me.