Installing Leopard Using an iPod

Follow these steps to use your iPod.Prerequisites: You must have an iPod with 8GB (that means 8GB iPod Nano, any HD based iPod, etc) Note: the iPod Touch + iPhone will not work for this.

So I had a lot of traffic and comments on my previous entry about how to install Leopard from an ISO without burning a DL-DVD. With that, the number one question everyone has been asking me is, “Can you an iPod to install Leopard?” and the answer is an astounding Yes! Follow these steps to use your iPod.Prerequisites:

  • You must have an iPod with 8GB (that means 8GB iPod Nano, any HD based iPod, etc)
  • Note: the iPod Touch + iPhone will not work for this. You need to have a click-wheel iPod that supports Disk Mode
  • A Leopard ISO

UPDATED: 11/18/2007Important Notes:

  • Intel based Macs can only boot from USB devices using the GUID partition scheme (this means 5G iPods, 2 & 3G iPod Nanos)
  • PowerPC (PPC) based Macs (ie G3, G4, G5 Processors) can only boot using Firewire devices using the Apple Partition Map scheme (all firewire iPods) 
  • I have had a lot of people have random problems when restoring the disc image to the iPods. Please make sure you have an exact image of the Install DVD. If there are any inconsistencies, there will be problems restoring the image. Please check the checksum of the images.

Procedure:

  1. Reset your iPod and force it into Disk Mode – Press and hold Menu + Center until you see the Apple logo. Then Press and Hold Center + Play/Pause. The screen should turn to gray-scale and show “OK to Disconnect” (circa old old ipods).
  2. Connect the iPod to your computer (do not use a USB hub if possible).
  3. iTunes will launch automatically and probably start syncing. Make sure “Enable Disk Use” is checked on the settings for iTunes and press Sync one more time.
  4. Quit iTunes and launch the Activity Monitor and quit the iTunes Helper.
  5. You should still see the iPod listed on your desktop as a mounted drive. If you don’t see the iPod mounted on the desktop, return to step 1.
  6. Open Disk Utility
  7. Select the iPod (the top one, mine is labeled 74.5 GB Apple iPod Media) then select the Partition tab.
  8. Change the selection from “Current Partition Scheme” to “1 Partition”. Click on Options and select GUID Partition Table and press OK. (NOTE: If you are going to use a PowerPC based Mac, ie G4 or G5, you need to select Apple Partition Map here. GUID is for Intel Macs ONLY)
  9. Give the Partition a name and select Partition. The system will ask you to authenticate.
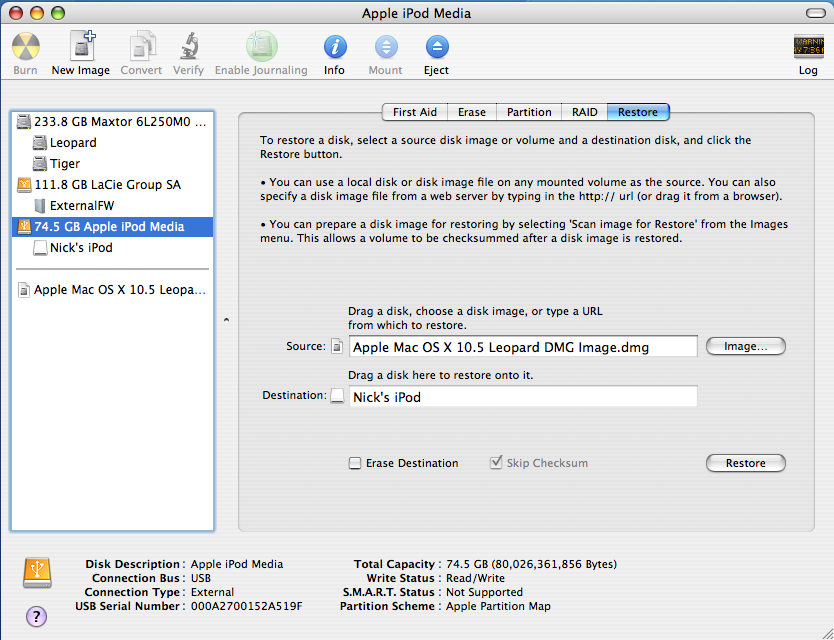
  10. Click on the Restore tab and drag the iPod partition to the Destination field
  11. Drag the Leopard image file to the Source field and press Restore. LeopardIpod 1
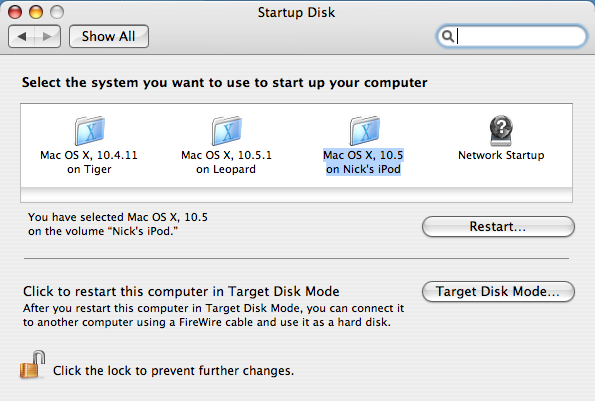
  12. Once complete, open System Preferences and go to the Start up Disk option. Make sure you see the iPod listed there. Select the appropriate drive and click restart.   LeopardIpod 2
  13. Install Leopard!

** If you are using a PowerPC Based Mac (G4, G5), you must use the Startup Disk utility in System Preferences to select the startup volume and reboot from this tool. Notes:

  • It’s really important the iPod stay in Forced Disk mode. If you try and boot up the Mac with the iPod connected but not in Disk Mode, it won’t do anything

Video Guide: 

Full Resolution Quicktime MOV Because of the amount of feedback I get on this article, I am disabling comments on this post and would like to invite readers to discuss on the newly created forum, http://nickganga.com/forum

Hi everyone. Since there is so much feedback to this article, I’m going to have to close the comments. If you want to chat with me, use my GTalk Widget on the sidebar or send me a message on Twitter. Thanks.

Simulate Full Audio Experience Without Disturbing Others

Connect headphones to headphone jack and raise volume to desired level.B.(PC Only) Prerequisites: Audio Card, Headphone jack that can be enabled simultaneously with external speakers1. Put headphones back in.*You can get even more control by adjusting the headphone volume (usually system volume).**For best results, disable all system sounds.C.(Platform Independent) Prerequisites: Airport Express (with firmware V6.3 or higher), headphone jack1.

So, living in a house with other people can sometimes be hard when you like to enjoy your music on the louder side but it is late a night. To compensate for this inconvenience, I’d like to share a few ways to enjoy full music whilst not bothering the others.
If you use headphones and have external speakers (preferably 5.1 or higher) playing the music simultaneously and synced, you can simulate hearing very full music without sacrificing quality or disturbing others. Over the past few years, have learned 3 ways to accomplish this task.

Universal Prerequisites: a computer, iTunes (latest version), external speakers, headphones

A.
(Platform Independent) Prerequisites: iPod*, iPod Dock
*This known working with the following iPods: 3G iPod (4 buttons), 4G iPod (click wheel), iPod mini. Not tested with iPod 5G (with video).

1. Connect the external speakers to the line out port of the iPod dock.
2. Place iPod in dock.
3. Play song and adjust external volume (as desired) using external volume controls (i.e. remote control, volume pad)
4. Lower iPod volume using wheel.
5. Connect headphones to headphone jack and raise volume to desired level.

B.

(PC Only) Prerequisites: Audio Card, Headphone jack that can be enabled simultaneously with external speakers

1. Lower external speaker volume using external controls.
2. Connect headphones and increase volume to desired level.
3. Remove headphones from ears and adjust external volume to a low level (as desired).
4. Put headphones back in.
*You can get even more control by adjusting the headphone volume (usually system volume).
**For best results, disable all system sounds.

C.
(Platform Independent) Prerequisites: Airport Express (with firmware V6.3 or higher), headphone jack
1. Enable “Multiple Speakers” in the Airport Express selector.

2. Make sure ‘Computer’ and you external speakers are selected.

3. Lower external speakers & iTunes volume and play a track.
4. Raise iTunes volume to desired headphone level.
5. Raise external speakers volume to desired level.
6. Put headphones back in.
*You can get even more control by adjusting the headphone volume (usually system volume).
**For best results, disable all system sounds.

This unique method of listening to music gives you the ability to experience the fullness of music you enjoy while maintaining the sound clarity and not disturbing others.

Apple Airport Express – AV/HD Product?

Ok, so since we all know the iPod Video 2nd Gen is coming, and so is the iTunes Movie Store, isn’t it logical to think that some sort of Airport AV product is coming too? If Apple is going to start charging $9.99 for feature length films on the Movie Store (that have strict DRM on them and no burning rights), I can’t see consumers being too happy about only being able to watch it on their iPods (whether or not you can connect the iPod to a TV).

Ok, so since we all know the iPod Video 2nd Gen is coming, and so is the iTunes Movie Store, isn’t it logical to think that some sort of Airport AV product is coming too? If Apple is going to start charging $9.99 for feature length films on the Movie Store (that have strict DRM on them and no burning rights), I can’t see consumers being too happy about only being able to watch it on their iPods (whether or not you can connect the iPod to a TV). After the recent updates to Airport Express (allowing you to play at multiple speakers simultaneously), I think they have some sort of Airport HD-AV product coming soon. I mean, what better way to ensure consumers are happy with the iTunes Movie store than to embed it into both the portable market and the living room. That would be quite a birthday present from Apple come April 1 🙂
Thoughts anyone?