I’m using the iPhone/iPod touch WordPress client. Not too shabby if you ask me!
Tag: ipod
iPod Touch 2.0 OS Now Available
The iPod 2.0 software is now available on iTunes! I just hit restore and it popped up 🙂 I just connected my iPod Touch to my computer and upgraded it via iTunes.
The iPod 2.0 software is now available on iTunes! I just hit restore and it popped up 🙂
UPDATE
I just connected my iPod Touch to my computer and upgraded it via iTunes. I didn’t have to buy the software update for the App Store or anything. It just works? I’m not sure why. I purchased the January Software update so this might be related to that. Any ideas cloud?
UPDATE: I just updated another iPod Touch and it worked!!
Mac Mini, Phase 1
Once the power has been separated from the optical block, I cut the power cords and attached quick connect adapters to the ends of the wires, for both the CD Changer and the Satellite radio connections.
Well, I am HAPPY to announce that Phase 1 of the MacMini in car server project has been completed. I have successfully installed the power supply and router for the MacMini in the BMW 325 Wagon Project. Sparing you the details of the project (those will come later), let’s go through the steps I went through today.
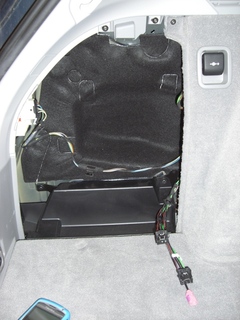 This project starts in the trunk of my wagon. Since the plan was to install the MacMini into the trunk of the vehicle, I started my expedition in the CD Changer/Satellite Radio compartment of the trunk. Since I do not have the CD changer or satellite radio, the trunk compartment has both connections waiting in the trunk. Each of the connections has two components: power and optical connection. For this project, I will not be using the optical connections but the power instead.
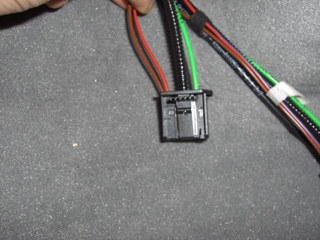 The power connectors (Brown & Orange+stripe) are connected to the plug as one, but can be separated from the kit. The first step is to separate the power from the optical block. Once the power has been separated from the optical block, I cut the power cords and attached quick connect adapters to the ends of the wires, for both the CD Changer and the Satellite radio connections. This provides me with power for both the Primary and Secondary power connections that come out of the Carnetix power inverter system. Once the power connector was separated, I cut the power cords and crimped on the quick connect ports.
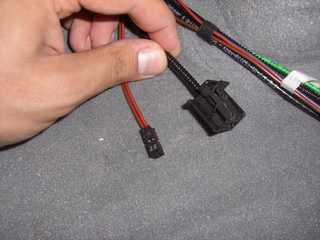 Now that the power has been separated, I went ahead and crimped on the corresponding quick connect clips to the wires on the cable supplied by Carnetix.
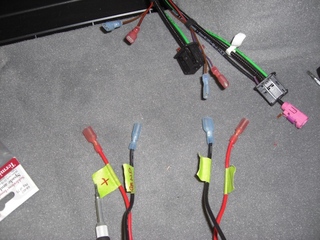 Notice that all the quick connects are crimped on and ready to go. ?The next step for the install involved finding a 12V source that only came online when the car is in Ignition On mode. Luckily, there is a 12V power plug located in the trunk right next to the compartment for the CD Changer, et all. I connected the ignition indicator wire to the positive line from the 12V source.
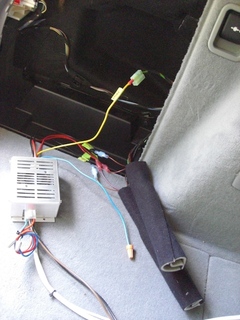
This completes the power requirements for the MacMini + BMW system.
Now that the power has been configured, there are two more steps to completing the phase: the fon router & connecting to the aux audio input. Save that for Part 2. 🙂
iPod/iPhone uses SkyHook Location Services in Google Maps
SkyHook has gone to the streets of the US with vehicles similar to Google street view cars and instead of capturing images, captured wireless network information and precise geographic information about those networks. To develop this database, Skyhook has deployed specialized vehicles to survey every single street, highway, and alley in 2500 US cities, scanning for Wi-Fi access points and plotting their precise geographic locations.
Now that Google Maps has made its way over to the iPod touch, the introduction a new feature called My Location has been introduced. Previously this feature was restricted to devices like the iPhone on a cellular network devices using cell antenna triangulation to determine location. With no cellular hardware in the iPod touch, how would My Location work? Enter SkyHook. Have you heard of SkyHook? SkyHook has gone to the streets of the US with vehicles similar to Google street view cars and instead of capturing images, captured wireless network information and precise geographic information about those networks.
To pinpoint location, WPS uses a massive reference network comprised of the known locations of over 23 million Wi-Fi access points. To develop this database, Skyhook has deployed specialized vehicles to survey every single street, highway, and alley in 2500 US cities, scanning for Wi-Fi access points and plotting their precise geographic locations. Source
SkyHook even has a Google Maps plug-in that will show you what areas have been scanned and are in the database. And yes, it works. Eerily well.
Installing Leopard Using an iPod
Follow these steps to use your iPod.Prerequisites: You must have an iPod with 8GB (that means 8GB iPod Nano, any HD based iPod, etc) Note: the iPod Touch + iPhone will not work for this.
So I had a lot of traffic and comments on my previous entry about how to install Leopard from an ISO without burning a DL-DVD. With that, the number one question everyone has been asking me is, “Can you an iPod to install Leopard?” and the answer is an astounding Yes! Follow these steps to use your iPod.Prerequisites:
- You must have an iPod with 8GB (that means 8GB iPod Nano, any HD based iPod, etc)
- Note: the iPod Touch + iPhone will not work for this. You need to have a click-wheel iPod that supports Disk Mode
- A Leopard ISO
UPDATED: 11/18/2007Important Notes:
- Intel based Macs can only boot from USB devices using the GUID partition scheme (this means 5G iPods, 2 & 3G iPod Nanos)
- PowerPC (PPC) based Macs (ie G3, G4, G5 Processors) can only boot using Firewire devices using the Apple Partition Map scheme (all firewire iPods)
- I have had a lot of people have random problems when restoring the disc image to the iPods. Please make sure you have an exact image of the Install DVD. If there are any inconsistencies, there will be problems restoring the image. Please check the checksum of the images.
Procedure:
- Reset your iPod and force it into Disk Mode – Press and hold Menu + Center until you see the Apple logo. Then Press and Hold Center + Play/Pause. The screen should turn to gray-scale and show “OK to Disconnect” (circa old old ipods).
- Connect the iPod to your computer (do not use a USB hub if possible).
- iTunes will launch automatically and probably start syncing. Make sure “Enable Disk Use” is checked on the settings for iTunes and press Sync one more time.
- Quit iTunes and launch the Activity Monitor and quit the iTunes Helper.
- You should still see the iPod listed on your desktop as a mounted drive. If you don’t see the iPod mounted on the desktop, return to step 1.
- Open Disk Utility
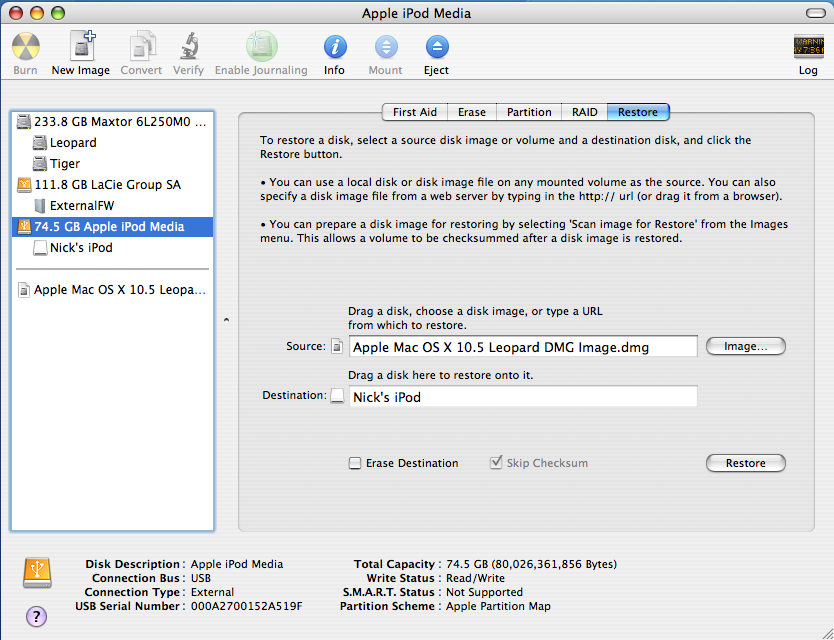
- Select the iPod (the top one, mine is labeled 74.5 GB Apple iPod Media) then select the Partition tab.
- Change the selection from “Current Partition Scheme” to “1 Partition”. Click on Options and select GUID Partition Table and press OK. (NOTE: If you are going to use a PowerPC based Mac, ie G4 or G5, you need to select Apple Partition Map here. GUID is for Intel Macs ONLY)
- Give the Partition a name and select Partition. The system will ask you to authenticate.
- Click on the Restore tab and drag the iPod partition to the Destination field
- Drag the Leopard image file to the Source field and press Restore.

- Once complete, open System Preferences and go to the Start up Disk option. Make sure you see the iPod listed there. Select the appropriate drive and click restart.

- Install Leopard!
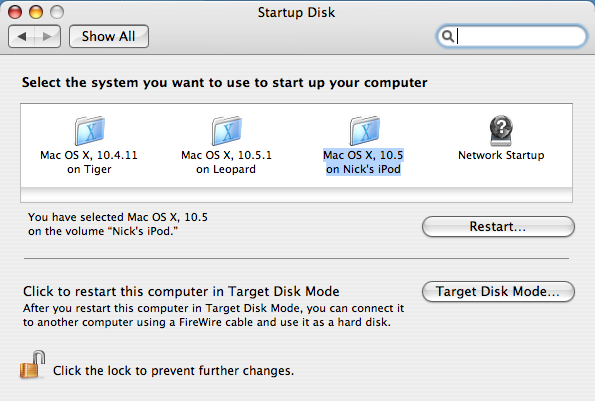
** If you are using a PowerPC Based Mac (G4, G5), you must use the Startup Disk utility in System Preferences to select the startup volume and reboot from this tool. Notes:
- It’s really important the iPod stay in Forced Disk mode. If you try and boot up the Mac with the iPod connected but not in Disk Mode, it won’t do anything
Video Guide:
Full Resolution Quicktime MOV Because of the amount of feedback I get on this article, I am disabling comments on this post and would like to invite readers to discuss on the newly created forum, http://nickganga.com/forum.
Hi everyone. Since there is so much feedback to this article, I’m going to have to close the comments. If you want to chat with me, use my GTalk Widget on the sidebar or send me a message on Twitter. Thanks.
Installing Leopard Without Burning a DL-DVD
Make sure that the drive is formatted using a GUID partition scheme (you may need to reformat your drive to get it in this form). The procedure is the same for an external hard drive, just substitute the iPod partition for the partition on your external hard drive.
So if you’re like me, you like to make legitimate backups of your software and original install discs. I always make an image of the disc using Disk Utility, included in OS X. Well, lets say you made a backup image of the new Mac OS X Leopard 10.5 disc and then accidentally destroy the disc, but you need to install the OS. Disk Utility to the rescue! As long as you have a spare external hard drive (I’m using a USB one in this case), you can extract the image to the HD and boot from it. Here’s how:
- Start by creating the disc image of the installation media (this can be DMG, CDR, ISO or any of the disc image formats supported by Mac OS X).
- Connect your external drive and launch Disk Utility.
- Select the drive in Disk Utility and then select the Partition tab. Make sure that the drive is formatted using a GUID partition scheme (you may need to reformat your drive to get it in this form). (NOTE: If you are going to use a PowerPC based Mac, ie G4 or G5, you need to select Apple Partition Map here. GUID is for Intel Macs ONLY)
- Once the drive is in the GUID partition scheme.
- Select the Restore tab of Disc Utility and drag the Disk Image for the Installation Media onto the Source field.
- Then drag the appropriate partition (in my case, the USB external drive) to the destination field.
- Press restore.
- Once the restore is complete, launch System Preferences and select Start up Disk. You should now see the external drive listed as a start up disk. Select it and press restart. You can now install as if you had inserted the DVD!
Additional notes:
- Plug the HD directly into the computer, not into a Fire wire or USB hub. The installer had trouble finding the internal HD when connected through a USB hub.
- This procedure should be the same for previous versions of OS X as well, except for PowerPC versions. PowerPC versions probably need to change the partition format of the drive to Apple Partition Map, but I’m not sure.
Video:Here is a demonstration of using an iPod as the external media. The procedure is the same for an external hard drive, just substitute the iPod partition for the partition on your external hard drive.
Full Resolution Quicktime MOV Happy Installing Everyone!
Hi everyone. Since there is so much feedback to this article, I’m going to have to close the comments. If you want to chat with me, use my GTalk Widget on the sidebar or send me a message on Twitter. Thanks.
iPod Touch JAILBROKEN!
This is an iPod Touch version 1.1.1.
Check out the videos! I followed the instructions located here. This is an iPod Touch version 1.1.1.
Pushed Across the Bridge
Ground up mounds that didn’t look like teeth at all, a very faint shade of yellow none-the-less.I am still in shock for the realization that two of my perfectly good teeth are now stumps of nothing and can never be what they once were and had I know two of my teeth were going to be destroyed, I’m not sure I would have agreed.
 After being asked nicely by my dentist for the last three cleanings, I agreed to allow her to extract my tiny baby tooth and make a bridge. This procedure involved first having the baby tooth extracted, next having my gum and jawbone surgically heightened and finally the bridge being placed. I got through the first and second steps without too much inconvenience or trouble, but today I had my temporary bridge placed.
I want to stop right here and say that my dentist never once made a big deal about any of these procedures being done. In fact, she told me it would make her happy to make the teeth look right. I felt very comfortable allowing her to complete the procedure.
Today I had my temporary bridge placed. I arrived at the dentist right on time and we got started right away. After being numbed up (which had become common practice since I had to be numbed up for the multiple appointments involved in parts 1 and 2 of this whole project), out came the drill. I laid back listening to my iPod as the dentist drilled away. At first, I thought she was just preparing the surfaces and making mounting points or something. After about 20 minutes, she was done drilling. I thought to myself, that was a long time, and as the thought passed through me, my tongue skimmed across the teeth. At first touch a shrill shock surged through my body. Where once I had perfect, while misplaced, teeth were rough gritty STUMPS! Trying not to freak out too much, as the doctor seemed like everything was going fine, I asked for a mirror to see what my teeth looked like. Horror shook my body when I saw what my perfect teeth had become. Ground up mounds that didn’t look like teeth at all, a very faint shade of yellow none-the-less.
I am still in shock for the realization that two of my perfectly good teeth are now stumps of nothing and can never be what they once were and had I know two of my teeth were going to be destroyed, I’m not sure I would have agreed. It almost feels like a part of me is missing now and I didn’t even know I was going to loose them. Another part of me thinks the dentist was unfair in not fully explaining what was at stake for this procedure.
While now, after doing a little research, I feel just a tad more comfortable it is still very weird. Take this as a warning. While a bridge may be necessary, if there are other options for your dental needs, take the time to consider them. I can never have my two teeth back and I don’t think anyone should feel the way I do about this.
Simulate Full Audio Experience Without Disturbing Others
Connect headphones to headphone jack and raise volume to desired level.B.(PC Only) Prerequisites: Audio Card, Headphone jack that can be enabled simultaneously with external speakers1. Put headphones back in.*You can get even more control by adjusting the headphone volume (usually system volume).**For best results, disable all system sounds.C.(Platform Independent) Prerequisites: Airport Express (with firmware V6.3 or higher), headphone jack1.
So, living in a house with other people can sometimes be hard when you like to enjoy your music on the louder side but it is late a night. To compensate for this inconvenience, I’d like to share a few ways to enjoy full music whilst not bothering the others.
If you use headphones and have external speakers (preferably 5.1 or higher) playing the music simultaneously and synced, you can simulate hearing very full music without sacrificing quality or disturbing others. Over the past few years, have learned 3 ways to accomplish this task.
Universal Prerequisites: a computer, iTunes (latest version), external speakers, headphones
A.


 (Platform Independent) Prerequisites: iPod*, iPod Dock
*This known working with the following iPods: 3G iPod (4 buttons), 4G iPod (click wheel), iPod mini. Not tested with iPod 5G (with video).
1. Connect the external speakers to the line out port of the iPod dock.
2. Place iPod in dock.
3. Play song and adjust external volume (as desired) using external volume controls (i.e. remote control, volume pad)
4. Lower iPod volume using wheel.
5. Connect headphones to headphone jack and raise volume to desired level.
B.
(PC Only) Prerequisites: Audio Card, Headphone jack that can be enabled simultaneously with external speakers
1. Lower external speaker volume using external controls.
2. Connect headphones and increase volume to desired level.
3. Remove headphones from ears and adjust external volume to a low level (as desired).
4. Put headphones back in.
*You can get even more control by adjusting the headphone volume (usually system volume).
**For best results, disable all system sounds.
C. (Platform Independent) Prerequisites: Airport Express (with firmware V6.3 or higher), headphone jack
1. Enable “Multiple Speakers” in the Airport Express selector.
2. Make sure ‘Computer’ and you external speakers are selected.
3. Lower external speakers & iTunes volume and play a track.
4. Raise iTunes volume to desired headphone level.
5. Raise external speakers volume to desired level.
6. Put headphones back in. *You can get even more control by adjusting the headphone volume (usually system volume).
**For best results, disable all system sounds.
This unique method of listening to music gives you the ability to experience the fullness of music you enjoy while maintaining the sound clarity and not disturbing others.
Save the Internet
Giant tech players, such as Apple, Microsoft & Google, have voiced their support for Net Neutrality and warned against the drastic and irrevocable harm the Internet would face without it.Broad Right-Left Coalition, Consumer Groups Rally Public Behind Internet FreedomGun Owners, Librarians Unite Against BellsAverage Joe and Saving The InternetHere is a short video explaining what Net Neutrality is and what is at stake today.MoveOnSaveTheInternet.comEliminating Net Neutrality has the potential to completely change the face of the Internet as we know it.ONLY YOU CAN HELP SAVE THE INTERNET.SIGN THE PETITION and CALL CONGRESS TODAY!Your voice needs to be heard.

As I am sure you all know, Net Neutrality is a HOT issue right now. After last week, we need to take some fast action to help protect the internet. Since we, the end users (consumers) are going to be the ones screwed by this legislation, we need to speak out TODAY. If you haven’t already done so, sign the petition and PASS it on to your friends, family, EVERYONE! We all know this is an important issue, and it only takes 2 minutes to fill out the form. JUST DOOOO IT.
Not sure what Net Neutrality is all about? Think about it this way, when you visit Google or use the iTunes Music Store, your internet traffic is treated the same. The network’s only job is to move your data from Point A to Point B and all data is treated equally. This is known as Network Neutrality.
America’s largest telecom and cable operations (AT&T, Verizon, Comcast etc.) want to get rid of the Internet’s first Amendment. They want to become the Internet Gatekeepers deciding which website go fast, slow or don’t even load at all. These providers want to ensure that the content that is most financially valuable to them is the content that performs the best. Let’s take a look at a few hypothetical examples:
1.Imagine the following. You use Google as your primary search engine and you love it. One day, your ISP (ie. AT&T, Comcast, etc.) partners with MSN Search. Suddenly, Google takes 30 seconds to load, and even longer to perform a simple search, but MSN Search runs at peak performance. Imagine if the ISP started blocking Google all together! Is that what you want the future of the internet to be?
2. Let’s say you have an iPod and you use iTunes with the iTunes Music Store to LEAGALLY purchase digital music for your enjoyment. One day, your ISP announces their own online digital music store and suddenly the iTunes Music Store takes 60 seconds to load or even longer. When you purchase a song it goes almost slower than DIALUP! The ISP is almost forcing you to use their own service by severely limiting and controlling your access to competing services.
3. Suppose you are part of a local band and use MySpace to help get your name out in the world, Flickr to share pictures on the net, and YouTube to broadcast your band. What if one day, your fans couldn’t get to your Flickr page or watch a video on YouTube because their ISP is blocking adequate bandwidth to use those services.
Still think this is a joke? Let’s take a look at some REAL LIFE examples of how ISPs are already abusing their power with the internet:
• In 2004, North Carolina ISP Madison River blocked their DSL customers from using any rival Web-based phone service.
• In 2005, Canada’s telephone giant Telus blocked customers from visiting a Web site sympathetic to the Telecommunications Workers Union during a labor dispute.
• Shaw, a big Canadian cable TV company, is charging an extra $10 a month to subscribers in order to “enhance” competing Internet telephone services.
• In April, Time Warner’s AOL blocked all emails that mentioned www.dearaol.com — an advocacy campaign opposing the company’s pay-to-send e-mail scheme.
This isn’t a joke. Net Neutrality is so important, groups, organizations, and companies are all voicing their support for Net Neutrality. Giant tech players, such as Apple, Microsoft & Google, have voiced their support for Net Neutrality and warned against the drastic and irrevocable harm the Internet would face without it.
Broad Right-Left Coalition, Consumer Groups Rally Public Behind Internet Freedom
Gun Owners, Librarians Unite Against Bells
Average Joe and Saving The Internet
Here is a short video explaining what Net Neutrality is and what is at stake today.
MoveOn
SaveTheInternet.com
ONLY YOU CAN HELP SAVE THE INTERNET.
SIGN THE PETITION and CALL CONGRESS TODAY!
Your voice needs to be heard.